Thursday, January 27, 2022

thumbnail

Changing Password in Django


Changing Password in Django

In most of the recent day's applications, password changing is a very common settings functionality. The most common practice is to provide a form which takes the old password, new and confirm password. Here at first it matches the old one. If it is correct then new password is set. There is a built in form that we can use for changing password in Django. 'update_session_auth_hash' method is used for setting the new password.

urls.py

from django.urls import path
from .import views
from django.contrib.auth import views as auth_views

urlpatterns = [
    path('passwordChange', views.passwordChange, name='passwordChange'),
]


views.py

from django.contrib.auth import update_session_auth_hash
from django.contrib.auth.forms import PasswordChangeForm


def passwordChange(request):
    form = PasswordChangeForm(user=request.user)
    if request.method == 'POST':
        form = PasswordChangeForm(request.user, request.POST)
        if form.is_valid():
            user = form.save()
            update_session_auth_hash(request, user)
            messages.info(
                request, 'Your password was successfully updated!')
            return redirect('passwordChange')
        else:
            messages.error(request, 'Please correct your informations')
    context = {'form':form}
    return render(request,'passwordChange.html',context)


passwordChange.html


        <form method = 'POST' action=''>
                {% csrf_token %}
                {{ form }}
                <button type="submit" class="">
                  Confirm
                </button>
            </form>


Friday, October 8, 2021

thumbnail

Your First Django Project Setup : A Complete Guide to Django Installation


Your First Django Project Setup : 

A Complete Guide to Django Installation


As you are reading this content, I think you already know what Django is. Django is a backend framework written in python programming language. Basically Django is a python library which has to be installed. The only requirement is that python has to be installed previously and it has to be added to the path. 


Steps:

  1. Django installation using pip

  2. Setting up your first Django project

  3. Creating first Django app

  4. Running the project


Step 1: Django installation


For installing Django simply go to your command prompt and write


pip install django


It will take sometime. The latest version of Django will be installed with this command. For installing a specific version of Django you have to write the command


pip install django==version_number


To check the installation in command prompt write


pip list


It will show all the packages installed with their respective versions.


Step 2: Setting up your first Django project


In Django at first a project is created then inside the projects apps are created. A project may contain one app or more apps based on the functionality. For example for user registration One app, for CRUD operations another app. It is done to make the structure simple. For making the project, open command prompt in the folder where you want to keep your project and write


django-admin startproject projectName


With this a folder will be created as ‘projectName’ inside which there will be a folder named ‘projectName’ and a ‘manage.py’ file.


File structure after creating the first project:


|--projectName

|--projectName

|--__pycache__

|--__init__.py

|--asgi.py

|--settings.py

|--urls.py

|--wsgi.py

|--manage.py

Step 3:Creating first django app


Your project may contain a number of apps. To create an app, change the directory to the ‘projectName’ (Here I have shown the project as ‘projectName’). For that in the command prompt write


cd projectName


Now you are inside the project directory where the manage.py file is located. Now write the command


python manage.py startapp myApp


Here myApp is the name of your app. With this command a folder named ‘myApp’ will be created. This is your first app. With this the file structure will look like this:

|--projectName

|--projectName

|--__pycache__

|--__init__.py

|--asgi.py

|--settings.py

|--urls.py

|--wsgi.py

|--myApp

|--migrations

|--__init__.py

|--admin.py

|--apps.py

|--models.py

|--tests.py

|--views.py

|--db.sqlite3

|--manage.py


Step 4: Running the project

To check whether your installation procedure was correct and it is working go to the cmd again without changing the directory and write


python manage.py runserver


If the installation process is alright the command prompt will be something like this


Now go to your browser and type the url 'http://127.0.0.1:8000/' which is the address of your local server running on port 8000. The server is running and in the browser the interface will come like this:


Which means your Django installation is successful. Now we are good to go for next tasks. 


There can be error in the installation process. Fill free to write those in the comment section.

Thank you!


Sunday, October 3, 2021

thumbnail

How to send confirmation email in django.


How to Send Confirmation Email in Django.

During the user registration user’s email is taken. It is very important to verify the user's email upon

registration. Moreover it is a very important security aspect practiced in the present days.

When a user is registered they provide their email address. Then a confirmation email is sent to the

given email with a link. When the user clicks the link, that user becomes an active user of the system.

Through email authentication two things are checked. One: whether the given email is a valid one,

two: the email given is actually owned by the user.


In Django email authentication can be done in many ways. The main concept is, when a user is registered, his ‘active’ field which is a Boolean field of the default ‘User’ class is made false and an email is sent to the user. When the link is clicked the user is made active. Here the link is generated with a token which is different for each user.


The whole process can be done from scratch. But there is an easier way to do this using a library named ‘django_email_verification’. All the steps are as follows:


Step 1: Install and configure the ‘django_email_verification’ library


To install the library go to your command prompt and write


      pip install django_email_verification


Now go to your settings.py and inside installed app include ‘django_email_verification’


INSTALLED_APP=[

….

‘django_email_verification’,

….

]


Step 2: Email configuration inside settings.py


Include the following codes inside settings.py file with necessary information


    EMAIL_BACKEND = 'django.core.mail.backends.smtp.EmailBackend'

    EMAIL_HOST = 'smtp.gmail.com'

    EMAIL_PORT = 587

    EMAIL_USE_TLS = True

    EMAIL_HOST_USER = 'your_email@email.com'

    EMAIL_HOST_PASSWORD = 'your_password'


    def verified_callback(user):

        user.is_active = True


    EMAIL_VERIFIED_CALLBACK = verified_callback

    EMAIL_FROM_ADDRESS = 'your_email@email.com'

    EMAIL_MAIL_SUBJECT = 'Your email Subject for email verification'

    EMAIL_MAIL_HTML = 'mail_body.html'

    EMAIL_MAIL_PLAIN = 'mail_body.txt'

    EMAIL_TOKEN_LIFE = 60 * 60

    EMAIL_PAGE_TEMPLATE = 'confirm_template.html'

    EMAIL_PAGE_DOMAIN = 'http://127.0.0.1:8000/'


Here,

EMAIL_MAIL_HTML is the email template in html and EMAIL_MAIL_PLAIN is the email template in text format. EMAIL_TOKEN_LIFE is the lifetime of the token in seconds. EMAIL_PAGE_TEMPLATE is the html template which will be shown just after registration with the message ‘Check your email for verification…..’. EMAIL_PAGE_DOMAIN is the domain of the web application. For local host it is ‘http://127.0.0.1:8000/’


Step 3: Writing required urls in urls.py


    from django_email_verification import urls as mail_urls


    urlpatterns = [

       ...

    path('email/', include(mail_urls))

    ...

    ]


Step 4: Registration of User and verification in views.py


    from django_email_verification import send_email

    from django.contrib.auth.models import User


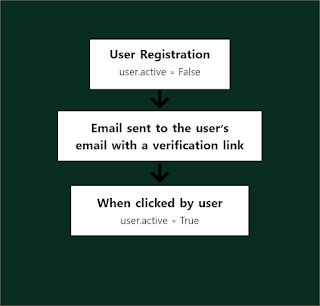
    def UserRegistration(request):

         user = User.objects.create(username=username,password=password,email=email)


User.is_active = False

        send_email(user)

        user.save()

        return render(request, 'confirm_template.html')


Here user creation is shown with the create method. It can also be done from a form. The important

thing is to make the is_active to False.


Step 5: Templates


main_body.html


<!DOCTYPE html>

<html lang="en">

<head>

    <meta charset="UTF-8">

    <title>Email Confirmation</title>

</head>

<body>

<h1>You are almost there, {{ user.username }}!</h1><br>

<h2>Please click <a href="{{ link }}" class = 'btn btn-sm btn-primary'>here</a> to confirm your account</h2>

<h2>The token expires on {{ expiry|time:"TIME_FORMAT" }}</h2>

</body>

</html>


main_body.txt


You are almost there, {{ user.username }}!

Please click the following link to confirm your account: {{ link }}

The token expires on {{ expiry|time:"TIME_FORMAT" }}


confirm_template.html


{% load static %}

<!DOCTYPE html>

<html lang="en">

<head>

    <meta charset="UTF-8">

    <title>Confirmation</title>

    <link rel="stylesheet" href="https://stackpath.bootstrapcdn.com/bootstrap/4.4.1/css/bootstrap.min.css" integrity="sha384-Vkoo8x4CGsO3+Hhxv8T/Q5PaXtkKtu6ug5TOeNV6gBiFeWPGFN9MuhOf23Q9Ifjh" crossorigin="anonymous">

    <style>

        .main{

            height: 100vh;

        }

    </style>


</head>

<body>

    <div class="container main d-flex justify-content-center align-items-center">

        <div class="row">


        {% if success %}

        <div class="col-12">

            <p class='text-center h3'>{{ user.username }}, your account is confirmed!</p>

            <a href="{% url 'loginUser' %}" class = 'btn btn-primary'>Log In</a>

        </div>

        {% else %}

        <div class="col-12">

        <p class='text-center h3'>Check your email to verify your account. If you do not find any email check it in the spam.  </p>

        </div>

        {% endif %}

        </div>

</div>

</body>

</html>


‘confirm_template.html’ will be redirected twice. Once the user is registered (can be changed in the views.py). Again when the link in the email is clicked it will redirect to the url ‘http://127.0.0.1:8000/email/<token>’ and the template will be the same ‘confirm_template.html’.


This is how email is verified in Django using django_email_verification library. 

Happy Coding..!